- Home
- Training Courses
- Membership
- About Us
- Instructors Blog
- December 2023: All I Want For Christmas
- November 2023: ESA Report Reviews
- October 2023: Can AI Write an ESA Report?
- September 2023: Getting Paid... or Not
- August 2023: Take Me Back...
- July 2023: To Bid or Not To Bid
- June 2023: Selecting a Supplier
- April 2023: Phase 1 Problems, Part 3
- March 2023: Phase 1 Problems, Part 2
- February 2023: Phase 1 Problems, Part 1
- January 2023: Working Outside in Winter
- 2022 Blogs
- 2021 Blogs
- December 2021: Asbestos in your Home
- Sept 2021: Dirty Jars And Other Bad Things… Part 2
- August 2021: Dirty Jars And Other Bad Things… Part 1
- July 2021: How do you want that drawing to look? Part 2
- June 2021: How Did You Want That Drawing To Look? Part 1
- April 2021: So You Need a RSC... Part 2
- March 2021: So You Need a RSC... Part 1
- February 2021: What's In Your Toolbox? Part 2
- January 2021: What's In Your Toolbox? Part 1
- 2020 Blogs
- December 2020: A Day in the Life, Part 2
- November 2020: A Day in the Life, Part 1
- October 2020: Exploring Your Career Path
- September 2020: So You Want To Start Your Own Business - Part 2
- August 2020- So You Want to Start Your Own Business
- June 2020: Effective Communication
- May 2020: Tips For Working From Home
- April 2020: Conducting ESA’s During a Pandemic
- March 2020: It's Not Easy Being Green
- February 2020: Looking Ahead; Bold Predictions for the Next Decade
- January 2020: Looking Back; A Decade in Review
- 2019 Blogs
- 2018 Blogs
- 2017 Blogs
- 2016 Blogs
- 2015 Blogs
- Find an AESAC Member
Menu- Home
- Training Courses
- » Training Courses
- » Webinar Series
- » Calender of Events
- » Course Registration
- » Course Instructors
- » Testimonials
- Membership
- » Become a Member
- » Certifications
- » Membership Search
- » Update Member Profile
- » Members Only
- » » Member Login
- » » Membership Renewal
- » » Create/Change Password
- » » CESA Certification Application
- About Us
- » About AESAC
- » Course Instructors
- » Contact Us
- Instructors Blog
- » December 2023: All I Want For Christmas
- » November 2023: ESA Report Reviews
- » October 2023: Can AI Write an ESA Report?
- » September 2023: Getting Paid... or Not
- » August 2023: Take Me Back...
- » July 2023: To Bid or Not To Bid
- » June 2023: Selecting a Supplier
- » April 2023: Phase 1 Problems, Part 3
- » March 2023: Phase 1 Problems, Part 2
- » February 2023: Phase 1 Problems, Part 1
- » January 2023: Working Outside in Winter
- » 2022 Blogs
- » » December 2022: Advice To My Younger Self
- » » October 2022: Pre-Purchase Due Diligence
- » » Sept 2022: Words Matter
- » » July 2022: Let Us Come To You
- » » April 2022: Due Diligence
- » » March 2022: Time Management
- » » February 2022: Spinning Augers... Part 2
- » » January 2022: Spinning Augers... Part 1
- » 2021 Blogs
- » » December 2021: Asbestos in your Home
- » » Sept 2021: Dirty Jars And Other Bad Things… Part 2
- » » August 2021: Dirty Jars And Other Bad Things… Part 1
- » » July 2021: How do you want that drawing to look? Part 2
- » » June 2021: How Did You Want That Drawing To Look? Part 1
- » » April 2021: So You Need a RSC... Part 2
- » » March 2021: So You Need a RSC... Part 1
- » » February 2021: What's In Your Toolbox? Part 2
- » » January 2021: What's In Your Toolbox? Part 1
- » 2020 Blogs
- » » December 2020: A Day in the Life, Part 2
- » » November 2020: A Day in the Life, Part 1
- » » October 2020: Exploring Your Career Path
- » » September 2020: So You Want To Start Your Own Business - Part 2
- » » August 2020- So You Want to Start Your Own Business
- » » June 2020: Effective Communication
- » » May 2020: Tips For Working From Home
- » » April 2020: Conducting ESA’s During a Pandemic
- » » March 2020: It's Not Easy Being Green
- » » February 2020: Looking Ahead; Bold Predictions for the Next Decade
- » » January 2020: Looking Back; A Decade in Review
- » 2019 Blogs
- » » November 2019
- » » September 2019
- » » August 2019
- » » July 2019
- » » May 2019
- » » March 2019
- » » February 2019
- » » January 2019
- » 2018 Blogs
- » » November 2018
- » » October 2018
- » » September 2018
- » » August 2018
- » » July 2018
- » » June 2018
- » » May 2018
- » » March 2018
- » » February 2018
- » » January 2018
- » 2017 Blogs
- » » April 2017
- » » June 2017
- » » August 2017
- » » September 2017
- » » December 2017
- » 2016 Blogs
- » » October 2016
- » » September 2016
- » » August 2016
- » » July 2016
- » » June 2016
- » » March 2016
- » » January 2016
- » » December 2016
- » » November 2016
- » 2015 Blogs
- » » April 2015
- » » July 2015
- » » September 2015
- » » October 2015
- » » December 2015
- Find an AESAC Member
Last month I discussed some of the common tools and equipment for soil sampling in a Phase Two Environmental Site Assessment. Many investigations will also require groundwater sampling, which will necessitate some additions and alterations to your sampling toolbox. Of course, you will still require the safety essentials, including a Site-Specific Health and Safety Plan, appropriate PPE and most importantly common sense.
Pre-Planning and Supplies
Similar to a typical soil sampling program, you will also need to pre-arrange a number of items for groundwater sampling
- Retain a qualified drilling contractor who is a licensed well contractor.
- Consult with your driller to confirm suitable methodology & equipment, well materials, protective well casings, well record data, etc. – there is a big difference in deep bedrock wells compared to shallow overburden wells.
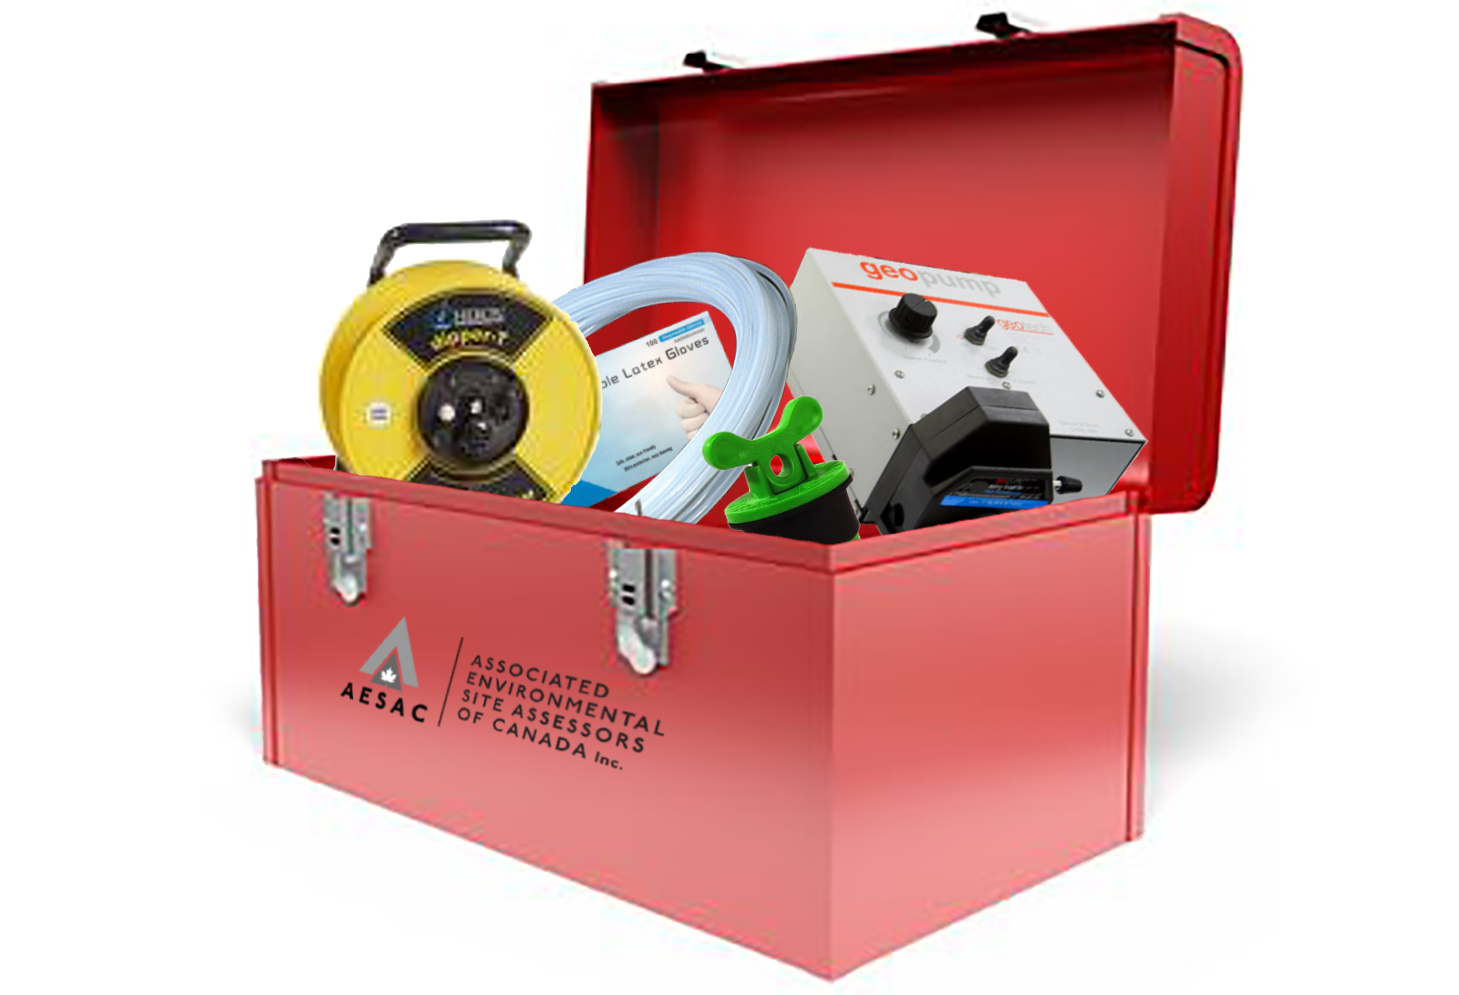
- Field equipment – equipment and supplies for developing and sampling wells can include:
o Waterra tubing, foot valves, bailers, in-line filters for metals sampling;
o Peristaltic or bladder pump(s) and associated tubing, and power supply for pumps;
o Flow cell or monitor to assess groundwater quality parameters;
o Water Level meter with Interface Probe to measure water levels and check for free product.
- Drums, pails or totes for containment of purged water (plan ahead to minimize your work effort). It is also useful to have a few dedicated pails to collect groundwater for characterization during well purging (i.e. to measure specific well volumes and to confirm static conditions), prior to collecting samples for analyses.
- Lab-supplied sample containers and necessary preservatives, coolers, ice, etc.
- Check the weather and plan ahead – trying to sample groundwater wells in sub-zero temperatures can be difficult and challenging; when temperatures fall below -15C or so, it can become near impossible as pumps or batteries die and water lines freeze – not to mention frostbite.
- At the planning stage, unless we have existing site data, it can be difficult to accurately estimate the time needed for proper well development in order to achieve representative groundwater conditions. How many well volumes must be purged? How fast will the wells re-charge and equilibrate? How many site trips will this take? Allow sufficient time for your field work and prepare to be flexible in your program.
What’s in your groundwater sampling toolbox?
The preferred tools for groundwater sampling are based on experience (both good and bad). Some of the most common sampling tools, along with a few other helpful items are listed below:
- Decontamination supplies – generally not as complex as with soil sampling; but still will need buckets, brush, clean (distilled) water, lab-grade soap. I also have dedicated spray bottles with distilled water and isopropyl alcohol for small items.
- Ziploc sample bags (I prefer to double bag water samples, in the event of bottles breakage its less of a mess), indelible water proof markers, extra (waterproof) pens or pencils.
- Field book and pre-formatted monitoring well logs, and a scaled site plan for reference. Don’t forget to survey monitoring well locations for elevation at both ground surface and top of well pipe.
- Basic hand tools – make sure to include sockets/wrenches & special tools and keys to access different types of well covers, plus pliers, screwdrivers, a knife or tubing cutter etc. A stiff brush or broom and shovel are also useful to uncover slightly buried flush-mount well covers.
- Finding recently installed (or older) wells in winter can be difficult in winter conditions, and I have wasted many hours trying to find wells under a blanket of fresh snow and old ice. If you can’t install stick-up well casings (e.g., in a parking lot), consider placing thin wire stakes with flagging tape in the surrounding well seal – they won’t affect vehicle traffic or a snow plow, but they will assist in finding your wells, at least for a short time. Alternatively, you can place a magnet or large stainless-steel bolt within the well casing and use a metal detector to locate the buried well casing. Either way allow a bit of time to re-locate your wells in winter.
- I have a few off-beat items that come in handy: a plastic turkey baster to remove ponded surface water inflow from a well casing; wire coat hangers or specially bent steel tent pegs to fish out tubing that has fallen down the well (or a small ice fishing reel and large hook, if tubing is stuck further down the well), and some small hand clamps to hold sample tubing at set depths for sampling.
- I also bring a foam gardening pad – it’s much easier on my old knees than kneeling directly on gravel, ice, etc.
Strategic planning, and having commonly used items in stock can contribute to a more productive sampling program, and a more enjoyable field experience.
Bill Leedham, P. Geo., CESA
Bill is the Head Instructor and Course Developer for the Associated Environmental Site Assessors of Canada (www.aesac.ca); and the founder and President of Down 2 Earth Environmental Services Inc. You can contact Bill at info@down2earthenvironmental.ca

In-House Training
Membership
About Us
Contact UsCopyright (c) 2026 Associated Environmental Site Assessors of Canada; AESAC Inc.